September 1, 2016
Did you know that over 60 HEIDENHAIN products are used in a unique robot for giant telescope development?


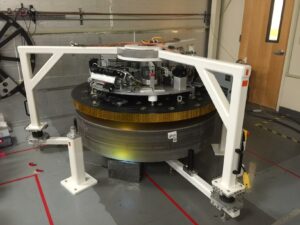
Overall Coherent robot.
Sixty-one HEIDENHAIN gauges and a multiplexor are integral parts of a unique metrology robot recently developed by Coherent IOS for use in the development of giant telescopes, such as now being done for the Thirty Meter Telescope (TMT) project. When completed, this astronomical TMT observatory is set to host an extremely large telescope with the promise of capabilities not yet realized in the world (www.tmt.org).
The design of such a large telescope requires the use of many, segmented mirrors in approximately 1.5m diameters in size at large quantities, such as 500. These mirrors must be polished just right in order to reflect and refract at ultra-precise levels. So to do just that, Coherent developed a unique 2-Dimenional Profilometer (2-DP) for part shape measurement.
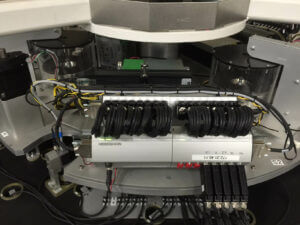
This new 2-DP surface metrology instrument consists of 61 probe gauges (HEIDENHAIN MT 2581s of METRO 25 series) suspended in a carbon fiber panel similar optimized for near Zero Thermal Expansion. These MT 2581 gauges are run through HEIDENHAIN’s MSE 1000 modular multiplexor that allows for data collection in one location since it can accommodate up to 250 devices at any one time.
“We chose these metrology components from HEIDENHAIN because I know they offer good precision, and are easy to use and incorporate,” explained Ulrich Mueller, senior engineering manager at Coherent IOS.

HEIDENHAIN’s MSE 1000 multiplexor holds 61 MT 2581 gauges on Coherent’s metrology robot.
Specifically, the steps to machine large telescope mirrors to tight tolerances consist of grinding, followed by polishing and cropping to a hexagonal shape, then finished by ion beam figuring. The polishing process is the most time intensive procedure. To make it more efficient, Coherent IOS first developed a computer-controlled stress mirror polishing SMP to bend the mirrors to their conventional aspheric shape. This very precise process (measurements need to better than 1um Peak over the whole parts) needs to be repeated many times, so that’s when Coherent’s 2-Dimenional Profilometer (2-DP) for part shape measurement comes into play.
In application, the carbon fiber panel of the 2-DP metrology robot with the 61 probe gauges is lifted and rotated on the telescope mirrors between measurements on the part to get a high data density. The result is fitted and analyzed against the design spec of the mirror.
This unique new 2-DP metrology robot provides an accurate, repeatable way of evaluating surface shape. In order to use multiple 2-DPs at different manufacturing sites, a reference sphere cross calibration scheme was introduced that links all systems to the master reference sphere. This provides the basis for a geographically-distributed manufacturing of the primary telescope mirrors. (Coherent IOS – www.coherent.com)
HEIDENHAIN’s METRO length gauge series consist of sturdy and highly accurate incremental length gauges. Their plunger actuation can be by cable lifter, the workpiece or pneumatically. The system accuracy is ± 0.2 µm.
HEIDENHAIN’s MSE modular multiplexor has brought revolutionary multi-channel electronics to metrology applications. With the availability of the TTL, inductive and analog interface modules for the MSE, its true potential is reached, allowing connection for up to 250 differing devices and the acquisition of measured values via Ethernet, especially useful in production line measurement systems.

