September 18, 2017
Qualified information on tool conditions


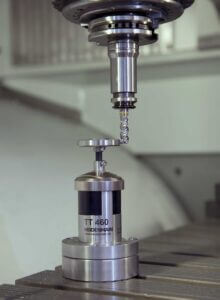
The TT 460 tool touch probe from HEIDENHAIN transmits its signal by radio or infrared from the working space.
Consistently high machining accuracy requires a precise record of the tool data and cyclic testing of tool wear. Tool touch probes from HEIDENHAIN can handle this task simply and quickly, within the process, and right in the machine.
When asked about the condition of the tool currently in use, machine operators typically answer, “The tool’s been on the machine for 30 workpieces. Experience shows that it lasts for 50 parts, so to be safe we switch tools after every 45 workpieces.” With all due respect for empirical values and safety margins, this can only partially replace truly reliable knowledge of the current tool condition. If the tool is worn out after 40 workpieces, it can have severe consequences for the workpiece and the machine. However, if the tool manages 50 or even 60 parts, it saves costs on tools. Tool touch probes ascertain the current tool condition directly on the machine. This provides reliable data for qualified statements in order to reduce the risk of damage and improve tool utilization.
Experience in tool measurement
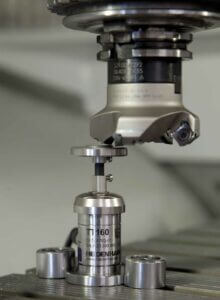
HEIDENHAIN offers two tactile systems for tool measurement: the TT 160 with cable-connected signal transmission and the TT 460 with radio and infrared transmission of the signals. In their current series, both combine more than 25 years of experience in tool touch probe systems. The TT 160 is now the fifth generation of cable-connected tool touch probes on the market. The main advantage of both tool touch probes is their very simple and fast way to measure tools within the process. That saves idle machine time, increases machining accuracy and reduces scrap and rework.
HEIDENHAIN controls permit very comprehensive measurements with very high degree of automation. To measure milling tools, a HEIDENHAIN control rotates the tool counter to the cutting direction and radially approaches the edge of the contact plate. The tool’s diameter is initially measured at the moment it touches and deflects the contact plate. At the same time, the tool touch probe measures the position of the largest tooth. To determine the tooth position more exactly, the spindle is then stopped and rotated step by step from tooth to tooth. The required rotational angle results from the number of teeth saved in the control. After this radial measurement, the length can also be measured with the non-rotating tool.

Thanks to its pluggable cable connection, the TT 160 can also be removed quickly and easily at any time.
To measure turning tools with the touch probe, you only need to exchange the round contact plate for a cuboid probe element. Then, with the corresponding touch probe cycles, such as for a milling-turning machine, you can also check turning tools for breakage or wear. The specially rounded edges of this cuboid probe also enable it to check milling cutters, so there’s no need to exchange the probe contact.
In addition to HEIDENHAIN controls, of course, the touch probes can also be used with any other NC control. That is why HEIDENHAIN offers measuring cycles for radius and length measurement.
Fast, accurate and long-lived
It only takes a single second to inspect a tool quickly and easily. A complete calibration including individual tooth measurement—depending e.g. on the tool and its number of teeth—can take several seconds. The plate of the tool touch probe is deflected upon contact. The signal thus triggered prompts the control to process the current tool position. The trigger signal is produced by an optical sensor that operates without contact and is therefore free of wear. The optical sensor is essential for the life of the tool and the long-term accuracy of the measured values. The attainable repeatability of measurement is better than 1 µm.
Depending on the measurement cycle performed, different data are available in the control system. This includes measured values for the diameter and length of the tool as well as information about broken or missing teeth, built-up edges, chips or plastic deformations of the teeth and, of course, complete breakage of the tool. The control can then provide qualified information on the condition of the measured tool. Is the measured tool the correct tool for the planned operation? Does it show wear? How much wear? Is the tool damaged in any way? Thanks to such information, the control can prevent the use of an incorrect, worn, or damaged tool and switch to an intact sister tool in due time. These measures prevent crashes on the one hand and, on the other hand, ensure the dimensional accuracy of the workpiece and a high surface quality.
Ready for use after a few steps
It is very simple to install a HEIDENHAIN tool touch probe on a machine table. The touch probe is attached to the machine table either by means of the supplied fixing clamps or by a mounting base from the accessory program. The machine operator then tightens a calibration tool into the spindle and positions it manually. With an automatic calibration cycle of the control, he can now ascertain the exact position of the touch probe. There is no need for mechanical adjustment because the base of the tool touch probe is ground in tight tolerance with the axis. Measurements can begin right after calibration.
When the tool touch probe is taken out of the machine, the mounting base can stay on the machine table. After the tool touch probe is remounted, the automatic calibration cycle can be started without manual pre-positioning. Thanks to their sturdy design, however, the tool touch probes can also stay in the machine during machining. Their sealing design protects from coolant and ensures IP68 protection. A chip-protection cover prevents damage from hot chips.
Built-in protection
Because probing is a mechanical action, there are constraints in probing tools with impact-sensitive teeth or micro tools. In such cases, only measurements with a stationary tool or with very slow probing are possible. A rated break point protects the TT 160 and TT 460 tool touch probes—or more precisely the optical sensor—from damage during probing. If the user moves the tool too far, a pin breaks between the probe contact and the touch probe. The machine operator can very easily exchange this pin by himself at any time, so that the touch probe can returned to operation quickly and at little cost. For both touch probes, optical deflection indicators show when the contact plate is moved. These indicators also function as displays for function and status testing, e.g. for whether the probe is switched-on and active.
The TT 460 tool touch probe is designed for use with a high degree of automation. It is switched on by the control before a measurement and switched off again after the touch probe cycle. It can also be used in 5-axis operation and with pallet changing systems. To keep power consumption as low as possible, when it is not used for a long time the TT 460 switches to a special energy-saving mode even below the actual standby mode. However, if the batteries do lose their charge, any battery with a voltage between 1 V and 4 V can be used. The electronics automatically detect the battery voltage and adapt to it.

