December 12, 2016
Exposed linear encoders: Permanently stable measured values and detailed accuracy data
 Intelligent signal processing ASIC for exposed linear encoders from HEIDENHAIN
Exposed linear encoders are used in applications requiring very high accuracy with measured values: in production and measuring equipment for the semiconductor industry, in PCB assembly machines and measuring machines as well as high-precision machine tools and direct drives. However, high levels of accuracy alone are not sufficient in such applications. More decisive is the permanent availability of stable measured values across the complete life of the encoders, unaffected by contamination.

Contamination on the measuring standard has no influence on signal quality.
To ensure that the high signal stability can be fulfilled over the encoders’ entire life cycle, HEIDENHAIN has developed a new signal processing ASIC, the HSP 1.0. It finds application in exposed linear encoders with incremental position value acquisition. The ASIC almost completely compensates fluctuations in signal amplitude due to interference. The underlying, significantly improved signal stabilization is particularly effective against contamination of the measuring standard or scanning reticle. The result is a permanently stable measuring signal almost entirely without impairment of interpolation accuracy or increased noise component.
Greater reliability through stable measured values
In principle, HEIDENHAIN encoders provide stable scanning signals that need no additional stabilization. However, contamination in the measuring standard and scanning reticle can negatively affect these scanning signals—the more contamination, the stronger its effects. Contamination cannot always be avoided or reduced, especially with exposed linear encoders. For this reason, HEIDENHAIN has developed a solution providing a long-lastingly stable signal despite increasing contamination: The signal processing ASIC HSP 1.0.

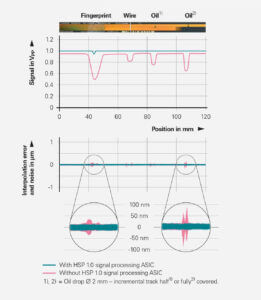
Effects of different types of contamination on the signal quality of an exposed linear encoder without and with the HSP 1.0 signal processing ASIC.
The HEIDENHAIN signal processing ASIC permanently monitors the scanning signal. If contamination on the measuring standard or scanning reticle results in signal changes, the HSP 1.0 almost completely compensates the resultant deviations to establish the original signal quality. In this way, this intelligent ASIC ensures that the scanning signal retains its high quality and stability for the long term. Interpolation deviation and position noise do not increase in normal operation from contamination. The signal amplitude stays nearly constant at 1 VPP. Even if the ASIC’s control limit were exceeded due to increasing, extremely heavy contamination, it would not result in an abrupt signal failure. Instead, the signal amplitude would only slowly decrease.
If the signal amplitude decreases, the HSP 1.0 readjusts it by increasing the LED current. The ensuing increase in the LED light intensity hardly affects the noise level in the scanning signals at all, even when there is a high degree of signal stabilization—quite contrary to systems in which the gain is made in the signal path, which increases the noise level.
However, the HSP 1.0 signal processing ASIC not only stabilizes the signal amplitude. It also ensures that the signal retains its original, ideal form. In this way it keeps the interpolation deviation very small even when the measuring standard and scanning reticle are contaminated.
Detailed accuracy data for better encoder selection
HEIDENHAIN is also introducing enhanced accuracy data for exposed linear encoders. This enables the design engineer to refer to detailed information when selecting the appropriate encoder for his application. In addition to accuracy, he can find the following data:
- Accuracy of the graduation over short intervals
- Accuracy of the interpolation
- Position noise

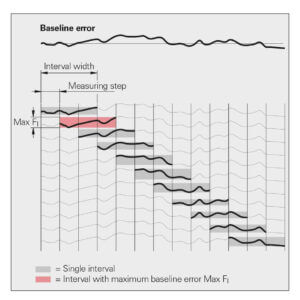
Ascertainment of accuracy over one interval.
This breakdown enables a much more precise prognosis of achievable accuracy in the specific application. The designer can then better and more easily select the encoder most appropriate for his respective application.
While the accuracy grade is specified for one section of maximally 1 m, or with shorter linear encoders for the entire measuring length and therefore describes the minimum accuracy of the system, the accuracy over one interval permits direct conclusions on the actually attainable accuracy of measured values in small intervals. In many applications, it is not the accuracy over the entire measuring range that is decisive, but rather the accuracy in a very narrowly limited section. On PCB assembly machines, for example, the last millimeters of the measuring path decide whether the mounting process can be highly accurate. In such applications, the user can obtain substantially more precise information from the accuracy over a defined interval than from the accuracy grade.
To be able to state accuracy over one interval, HEIDENHAIN first defines the interval width for which the accuracy is to be stated. With the LIP 200, for example, the interval width is 5 mm. Then the scale is continually measured over its entire measuring length in defined, very small measuring steps with the chosen interval width. Finally, the uncompensated baseline errors over the interval width measured in this way for each measuring step are evaluated. The worst value, i.e. the greatest measured baseline error over all measured intervals, is then specified as the maximum value ±FI.

