September 18, 2017
In-process measurement in harsh environments

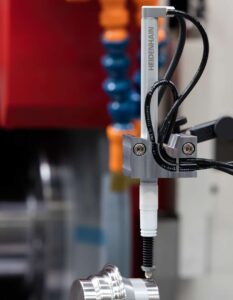
 In-process measurement is becoming increasingly important in the field of metrology. Measurement in the working space of a machine presents special requirements for robustness of a length gauge. The ST 3087RC is HEIDENHAIN’s new SPECTO length gauge conceived for tactile measurement in harsh environments.
The ST 3087RC shown here is based on a standard ST 3087 and was additionally equipped with a bellows, a housing for the plunger and a cap for protection against splash water. The additional components protect the optical scanning under adverse conditions. Because the length gauge is based on a standard product, the characteristic values, e.g. for accuracy or repeatability, remain the same. However, the fastening dimensions have been adapted to provide additional space for the additional components.

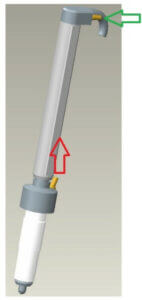
Figure 1

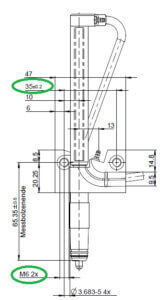
Figure 2: Fastening to a plane surface

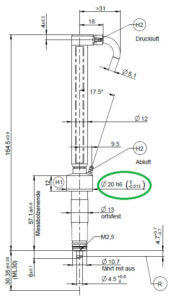
Figure 3: Fastening to a clamping shank
In the retracted rest position, the housing and splash guard protect the bellows. During the measurement (coolants are normally switched off at this time), the plunger is extended by pressurized air. The length gauge features two connections for pressure tubing. Just as in the standard version, the connection for actuating the plunger (Figure 1, green arrow) is at the cable outlet. When the cap closes the housing, it collects pressurized air which is released by a further connection at the base (Figure 1, red arrow). This tube must be located at a contamination-free area of the machine to prevent ingress of contamination into the device.
Two methods were developed for attaching the length gauge. The intention was to ensure compatibility with the screw connection of the MT 25PW and offer an alternative for new confined space conditions. The illustrations on this page show two possibilities for fastening the length gauge. Figure 2 shows the screw connection with the clearance and thread diameter encircled. Figure 3 shows connection with a mounting shaft.
This new ST 3087RC gauge is especially suited for grinding and other machine tool applications thanks to the high IP rating and low cycle time of 1.5 seconds for air actuation. The long travel of the gauge allows for flexible fixturing to the machine tool, enabling in-field upgrades and unique custom machine designs.
The gauge boasts an accuracy of 1 µm and when paired with 10x interpolation factor, sports a resolution of 0.5µm to supply reliable in-process measurements.

